An eSIM lets you get mobile data for a trip to China without inserting a physical SIM card. You buy a plan, download its profile to a compatible phone and select it for mobile data. You can keep your usual phone number active on a separate line if you need it.
Before paying, check three things: whether your phone supports the eSIM, whether the plan covers your route, and what starts its validity period. This guide walks through buying on Trip.com, setting up an iPhone or Android phone, and troubleshooting common problems.
Source facts checked on 12 September 2026. The English website walkthrough and screenshots were checked on 13 September 2026. Our walkthrough reached the payment-details screen. Payment and connectivity in China were not tested. Website screenshots are genuine; phone-setting illustrations are teaching diagrams based on manufacturer documentation.
Flying soon? Start here
- Check your exact phone model and confirm that it is not locked to a carrier.
- Choose coverage for mainland China and any stopovers where you need data.
- Read the rules for validity, data allowances and refunds.
- Buy the plan and save the order and instructions for offline access.
- Install the profile over reliable Wi-Fi at the time recommended by the seller. On an iPhone, do this before you fly: Apple states that eSIMs from carriers that do not operate in mainland China cannot be installed while you are in mainland China.
- On arrival, select the eSIM for data, set roaming as instructed, and turn off automatic data switching to your home SIM.
If the connection does not work, do not delete the installed profile. Check the settings and contact support first.
A few terms you will see
- eSIM profile or line: the mobile plan installed on your phone. It appears separately from your usual number in the SIM list.
- Home SIM: the SIM with the number you normally use at home.
- Mobile data or cellular data: internet access through a mobile carrier.
- Data roaming: permission to use data through another carrier's network. Travel eSIMs often need it; configure your home line separately.
- QR code: a square image that your camera can scan. Installation requires the eSIM code from your order, not a payment code or an app-download code.
- Personal hotspot or tethering: sharing your phone's mobile data with another device.
If someone helps you, carry out the checks and installation on the phone you will take. Enter passwords and bank verification codes, and confirm payments, yourself.
What does a travel eSIM include—and does it have a number?
An eSIM is a way to install a mobile plan. The plan determines the service: some include only data, while others include calls and SMS. Look for “data only” or an explicit list of included services in the product details. Apple's guide to travel eSIMs.
A data-only plan does not include ordinary phone calls or SMS. You can communicate through apps when those services are accessible. If you specifically need a Chinese number for calls or a local service, look separately for a plan that includes one.
With a data-only plan you cannot call the clinic, your coordinator or local emergency numbers as an ordinary phone call. Agree on a messaging app with the clinic and your coordinator in advance, save their contacts offline, and check with your home carrier whether your usual number will still receive incoming calls.
A Chinese number is not required just to register for WeChat or Alipay. The official guide for foreign visitors allows a foreign or Chinese mobile number. You still need access to your number for verification: a data eSIM does not register or verify an account for you. Chinese government guide, Mobile payment section.
Step 1: check eSIM compatibility before buying
Check the full model number and the market your phone was made for. “iPhone” or “Galaxy” alone is not enough; regional versions can have different capabilities.
On an iPhone, look under Settings → Cellular → Add eSIM. Also open Settings → General → About → Carrier Lock. To use another carrier freely, this should say “No SIM Restrictions”, or the equivalent in your phone's language. Apple's requirements.
On Android, search Settings for “eSIM” or “Add eSIM”, then compare your model with the manufacturer's and seller's compatibility information. If the option is missing, give support your exact model number before paying. Samsung's list and regional qualifications.
Take particular care with phones made for mainland China. Even a model with eSIM support may restrict foreign profiles, and the restriction applies by location: Apple states that eSIMs from carriers that do not operate in mainland China cannot be installed while you are in mainland China. Install a foreign eSIM on an iPhone before you fly. An iPhone bought in mainland China also holds no more than two eSIMs, and Location Services must be on to activate a foreign eSIM while travelling. Apple's regional conditions.
An EID identifies the embedded eSIM component. Finding one can help with compatibility checks, but does not guarantee that every travel plan will work. You still need to check the regional model and carrier restrictions. Google explains where to find an EID in Pixel settings. Google's EID instructions.
Step 2: choose coverage, validity and data allowance
Write down your route—for example, Shanghai–Hangzhou or Hong Kong–Shenzhen. For the second route, look for a plan that explicitly includes both Hong Kong and mainland China. The word “China” in a title does not confirm coverage of every territory or stopover.
Before paying, check the following:
| Check | What the terms should tell you |
|---|---|
| Coverage | Every place where you need mobile data |
| Validity | When the plan starts and ends |
| How days are counted | Calendar days or 24-hour periods, and the relevant time zone |
| Data allowance | A total for the trip or an allowance per day |
| After the limit | Whether data stops or continues at reduced speed |
| Hotspot | Whether you can connect a laptop or another phone |
| Top-ups | Whether you can add data to this profile |
| Installation and refunds | Deadlines for installation, cancellation and refunds |
“10 GB for 10 days” and “1 GB per day for 10 days” are different offers. The first has a total allowance; the second has a daily limit and a reset rule. Do not assume unused daily data rolls over unless the seller says so.
Check “unlimited” offers too. They may limit high-speed data and reduce speeds afterwards. Airalo, for example, describes this policy for its unlimited packages. That is an example from one provider, not a rule for every eSIM. Airalo's unlimited-plan policy.
How much data should you buy?
Your own mobile-data history is more useful than a claim that “1 GB is enough for everyone”. Check a few ordinary days of usage, then allow for navigation, translation and photo sharing on your trip.
For example, an expected 0.5 GB per day over ten days comes to 5 GB. Adding a buffer of 30% gives 6.5 GB. This is a calculation with chosen assumptions, not a measured usage recommendation.
If you expect video calls, streaming or laptop tethering, choose for those activities and check daily limits. Do not rely on hotel Wi-Fi in your calculation until you know you can use it.
Step 3: buy a China eSIM on Trip.com
Open Trip.com's eSIM and SIM-card section and find an offer for your route.
You can change the language and currency in the top menu.
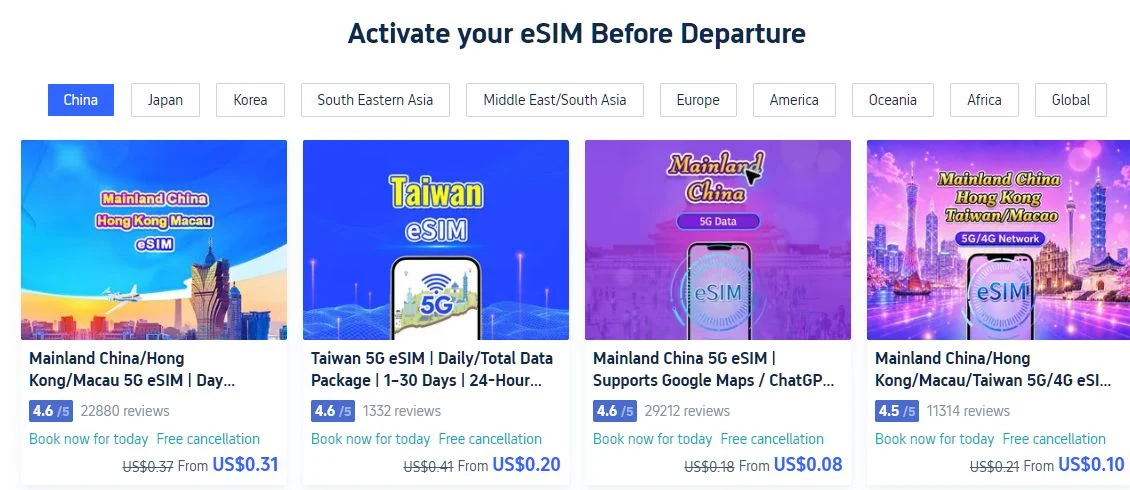
The English Trip.com listing on 13 September 2026. Check the regions included in the product title.
Create an account or sign in
- Select Sign in/Register at the top of the site.
- Enter an email address you can access before and during your trip.
- Choose Continue with email and follow the verification prompts. The next screen may depend on whether an account already exists. If asked for a code, use the one in your email; if asked for a password, use your account password or password recovery.
- If asked to create a password, save it in a password manager. Check your email address and the service terms before completing registration.
- Return to the eSIM listing and confirm that you are using the right account.
In our English session the form also offered Google, Apple, Facebook and WeChat sign-in; the sign-in methods on the English site may differ from those on the Russian one. You need the relevant account, and a visible button does not guarantee that sign-in will work on your network.
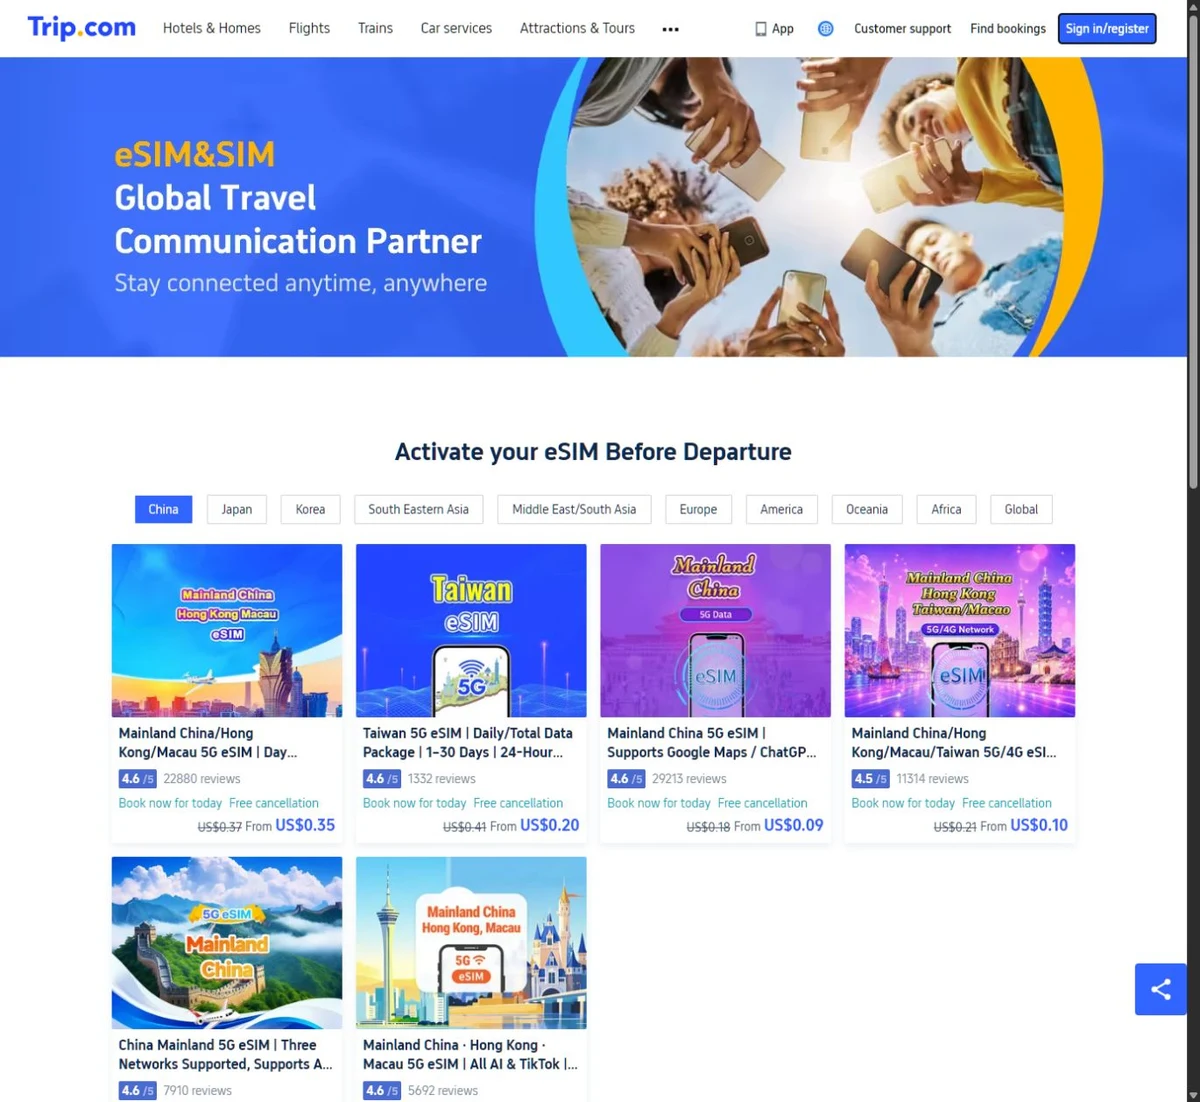
The Sign in/register button is at the top right. Enter your own email in the form it opens; email verification was not completed in our demonstration.
If no email arrives, check the address, your spam folder and the on-screen guidance. Avoid creating several accounts for one order, and keep verification codes private.
Must you register before choosing a plan? During our check, we could select an eSIM and open the contact form without signing in. This confirms that order preparation was possible, not that payment could be completed without an account.
Signing in through Google
Choose Continue with Google, select your Google account and follow the verification steps. Enter a Google password only on Google's page, not in Trip.com's email field. Back on Trip.com, check that your profile appears in the top menu.
The account owner signed in through Google personally during preparation of this guide. We checked Trip.com afterwards: the profile menu and orders section were accessible. The Google confirmation screen is not reproduced here.
Find your order after signing in
- Open the profile menu at the top right.
- Select My Bookings. In the English interface we checked, the page had the same heading.
- Open the relevant entry. For a newly created order, check Awaiting payment.

The English My Bookings page on 13 September 2026. Booking identifiers and personal details are outside the image.
Awaiting payment means the order has not yet been paid. The page we checked also had a timer and an automatic-cancellation warning. A booking number and instructions alone do not mean a working eSIM has been issued.
In the order details, look for How to use → More. During the original Russian walkthrough, the unpaid order already showed this section, including installation, roaming, APN and extension instructions. These are general product instructions. Check separately for your personal QR code and issuance status after payment succeeds.
If the order has incorrect options, check whether you can cancel it. During the original Russian walkthrough, Trip.com offered free cancellation for the unpaid order we checked; after cancellation its status changed to Cancelled. Do not apply this result to paid or activated eSIMs. Removing an entry from your history is a separate action and does not cancel the service.
Choose a plan and enter your details
- Open the product and confirm that it is an eSIM, not a physical SIM for airport collection.
- Select the validity and data allowance, then read the terms for that exact option.
- Check compatibility, the validity trigger, hotspot rules, cancellation and the total price.
- Supply an accessible email address and use a payment method offered for that order.
- After payment, find the order and instructions. Save the order number, installation method and support details before departure. Trip.com product details and instructions. Trip.com also describes the purchase process in its own eSIM guide — the seller's own material, not an independent source.
Example: 10 days with 10 GB in total
For the demonstration, we opened product 53873746 and selected 10 days → 10 GB total → quantity 1. This is one allowance for the whole period, not 10 GB each day. For this option, data stops when the allowance runs out; a day means 24 hours. The listing says you can install the eSIM in advance and that billing starts when the eSIM is enabled at your destination.
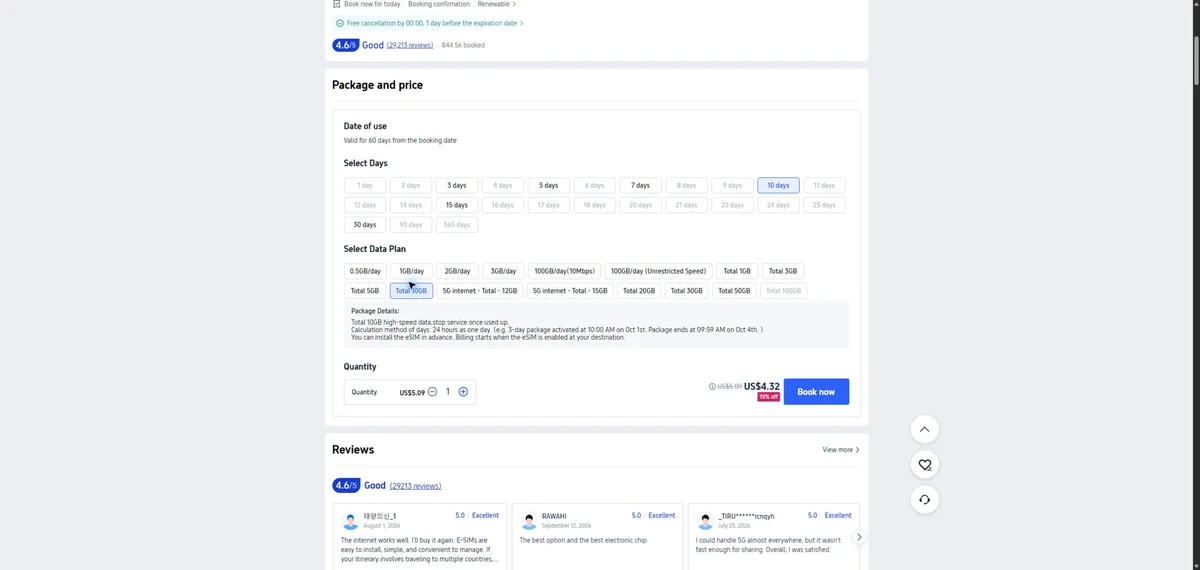
English selection checked on 13 September 2026: USD 5.09 before the displayed discount, USD 4.32 afterwards. These are recorded prices, not a promise of the price available to the next buyer.
Discounts differed between the Russian and English versions of the site on our check dates: on 12 September the Russian listing showed a 10% discount and a USD 4.58 total for this option, while the English listing showed 15% and USD 4.32 on 13 September. The set of promotions depends on the language version, the date and the account, so rely on the total shown in your own order.
Selecting Book now opened a form asking for a full name, phone number with country code, and email address. Enter genuine buyer contact details, taking particular care with the email for the instructions.
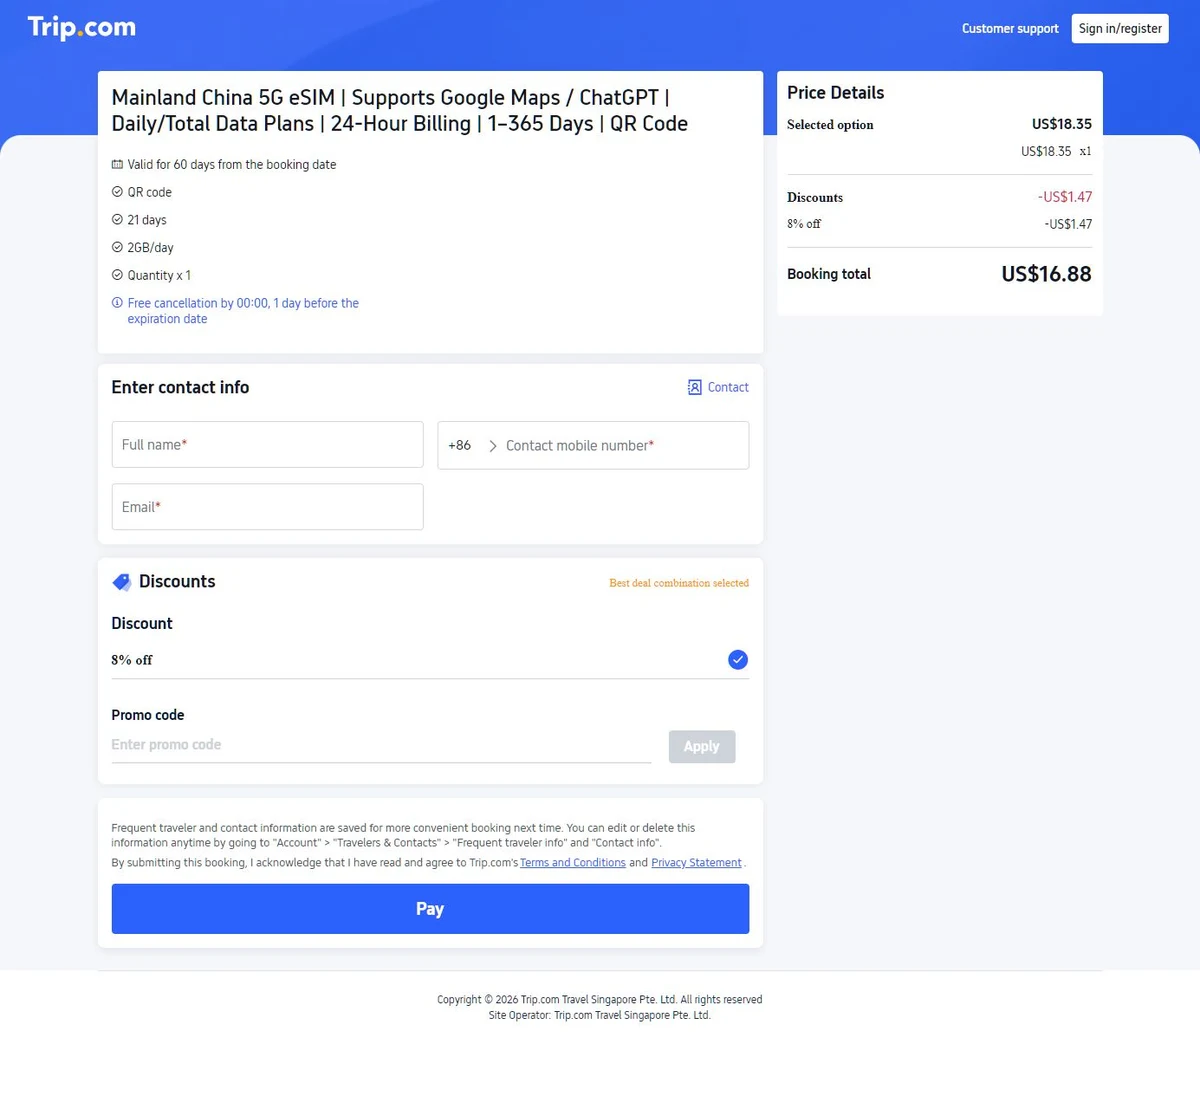
An unsubmitted English contact form on 13 September 2026, showing the 21-day example below. Enter your own phone country code; the default shown is not a requirement to have a Chinese number.
Second example: a daily allowance and saved contacts
We then opened another option for the same product: 21 days / 2 GB per day / one eSIM. In our walkthrough, the option's description specified a reduction to 384 kbps after the daily high-speed allowance, with data resetting every 24 hours from activation. This differs from the 10 GB total option, which stops data when its entire allowance is used.
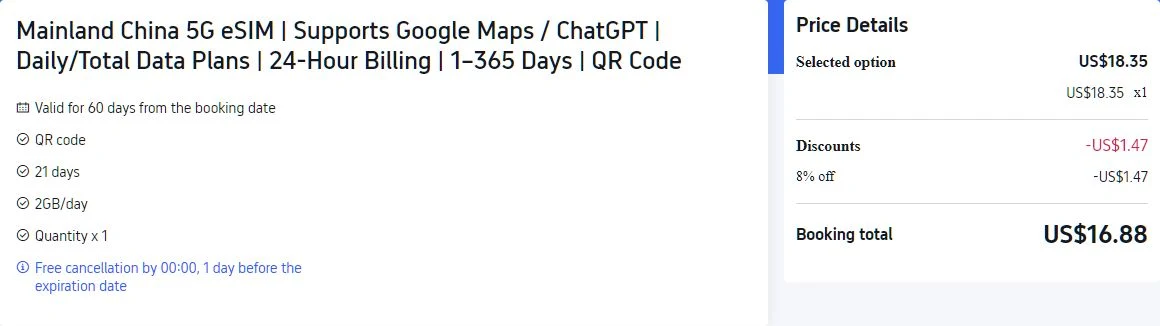
English checkout checked on 13 September 2026: USD 18.35 before discounts, USD 16.88 after the displayed discount. This is a separate example, not a change to the 10-day/10 GB plan above.
We opened this form in a signed-out session, so the fields stayed empty. When you are signed in, Trip.com may fill in your name, phone and email from saved contacts — check them again before paying, especially if you previously booked for someone else. Contact details are part of your order; do not enter a random number simply to get past the form.
The set of discounts and promo codes can also differ from product to product. In the form we checked, several offers were shown beside the total and not all of them applied. Rely on the final total and the applied mark rather than on the largest percentage in the list.
Promotions can differ between visits, language versions and accounts. The Russian walkthrough on 12 September showed USD 15.96 for this option, while the English checkout on 13 September showed USD 16.88. Use the total shown for your own order, not a discount seen in another screenshot.
Check payment details and find the eSIM
Before selecting Pay, recheck coverage, days, allowance type, quantity, email and total. Read the cancellation rules for your order: an advertisement for free cancellation does not replace its conditions and deadline.
Submitting the contact form in our walkthrough opened a separate Select a Payment Method screen. The order existed at that point but was unpaid. Check its eSIM name, options and total before entering payment details. We also checked the bookings list: the new order showed Awaiting Payment, USD 16.88.
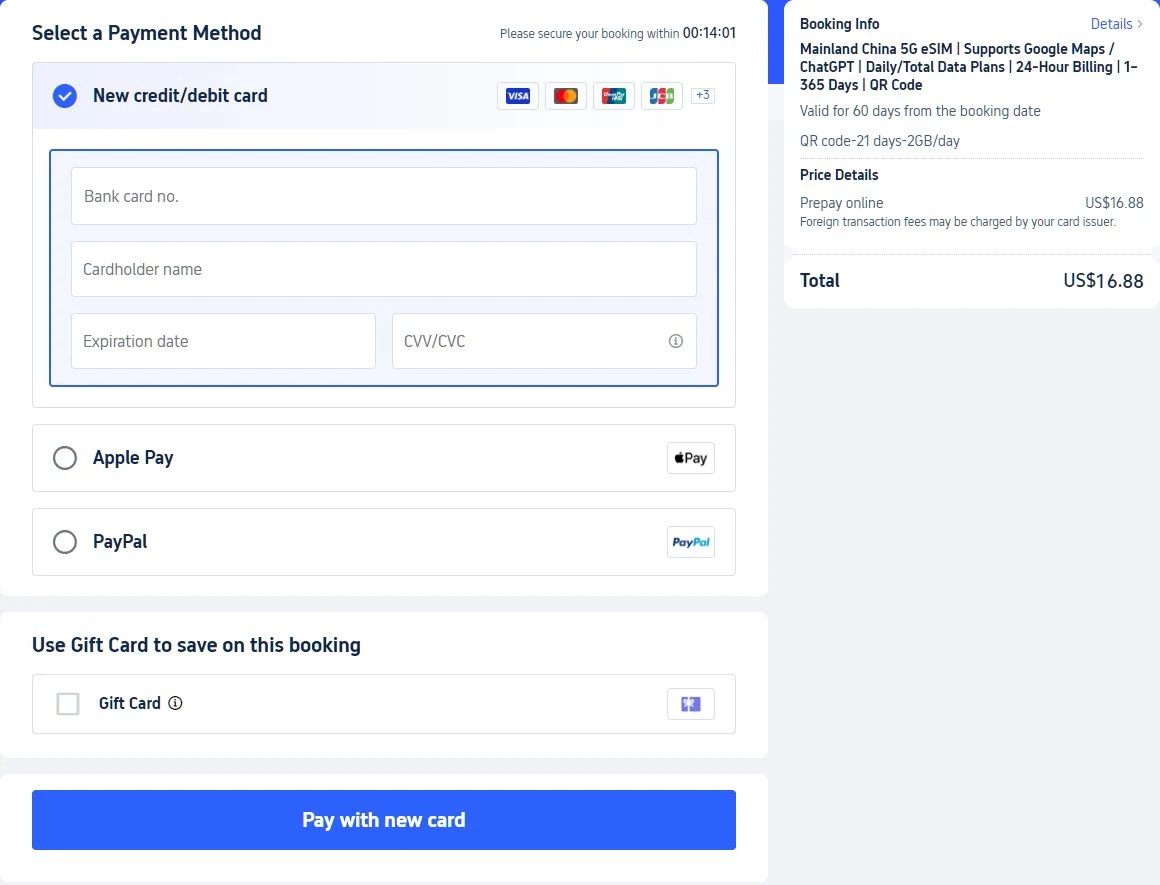
The real English payment-details screen on 13 September 2026. No card details were entered and no payment was made. Personal information and the order number are outside the image.
Our USD order offered a new credit/debit card, Apple Pay and PayPal, plus a separate gift-card section. Options can differ by order, currency or account. Their presence does not confirm that every card will be accepted.
For a new card, the form requested:
- Bank card no.: the number of the card being used.
- Cardholder name: the holder's details as required by the bank.
- Expiration date: the month and year on the card.
- CVV/CVC: the card security code. Do not send it to support in a chat or include it in screenshots.
This screen also had a timer. If it expires, check the order status before following Trip.com's next steps. Do not use sample card details from the internet or enter random digits as a test.
In our walkthrough, Pay on the previous page opened the payment form; it did not mean money had been charged. The payment page then showed a separate Pay with new card button. Labels can change, so read the screen and amount. Any subsequent bank verification and successful eSIM delivery were not tested.
The remaining steps follow the seller's instructions; we did not complete payment or receive an eSIM:
- Before final confirmation, check the amount and payment method. If none suits you, ask support before another attempt.
- Complete bank verification if required. Check the order status on Trip.com: a bank notification alone does not establish that the eSIM has been issued.
- Open the order and its eSIM instructions. The seller describes an Install button or installation link, a QR code, or manual SM-DP+ and Activation Code details.
- If payment succeeded but instructions are missing, contact support through the order. Do not buy the same package again until the first payment's status is clear.
- Save the installation details offline and keep the QR code private. Continue with your phone's instructions below. Instructions for the selected product.
If your card is from another country
A site's display language or the currency shown does not tell you whether your card will be accepted. Check the methods offered for your order, any cross-border restrictions your bank applies and the payment result. If a payment is declined, check the order status and any charge first, then ask Trip.com support about an available method.
For any payment method, compare the price for the full package you need, not the advertised “from” price. Record validity, allowance, reduced-speed terms and hotspot rules beside the amount so you compare equivalent services.
Step 4: decide when to install and activate
Three events are easy to confuse:
- Payment: payment for the plan is confirmed. General instructions may be available earlier; check separately that installation details have been issued.
- Installation: the eSIM profile appears on your phone.
- Start of validity: the clock starts on your paid period.
These do not necessarily happen together. Depending on the package, validity may begin on installation or connection to a supported network. “Install a month early without using any days” is not a universal rule. Airalo's explanation of validity periods.
If the terms explicitly allow advance installation with validity starting on the first connection at your destination, install at home over stable Wi-Fi. On an iPhone, complete the installation before you fly in any case: Apple states that eSIMs from carriers that do not operate in mainland China cannot be installed while you are in mainland China. If installation starts the clock, time it around your flight—you cannot postpone it until you land. A regional plan might find its first supported network during a stopover.
Save the instructions offline. Keep the QR code and activation details private; do not publish them or forward them to group chats.
Step 5: install the eSIM on your phone
Install it on the device you will take. Do not try the QR code on someone else's phone first: reinstallation and transfer rules depend on the seller.
iPhone
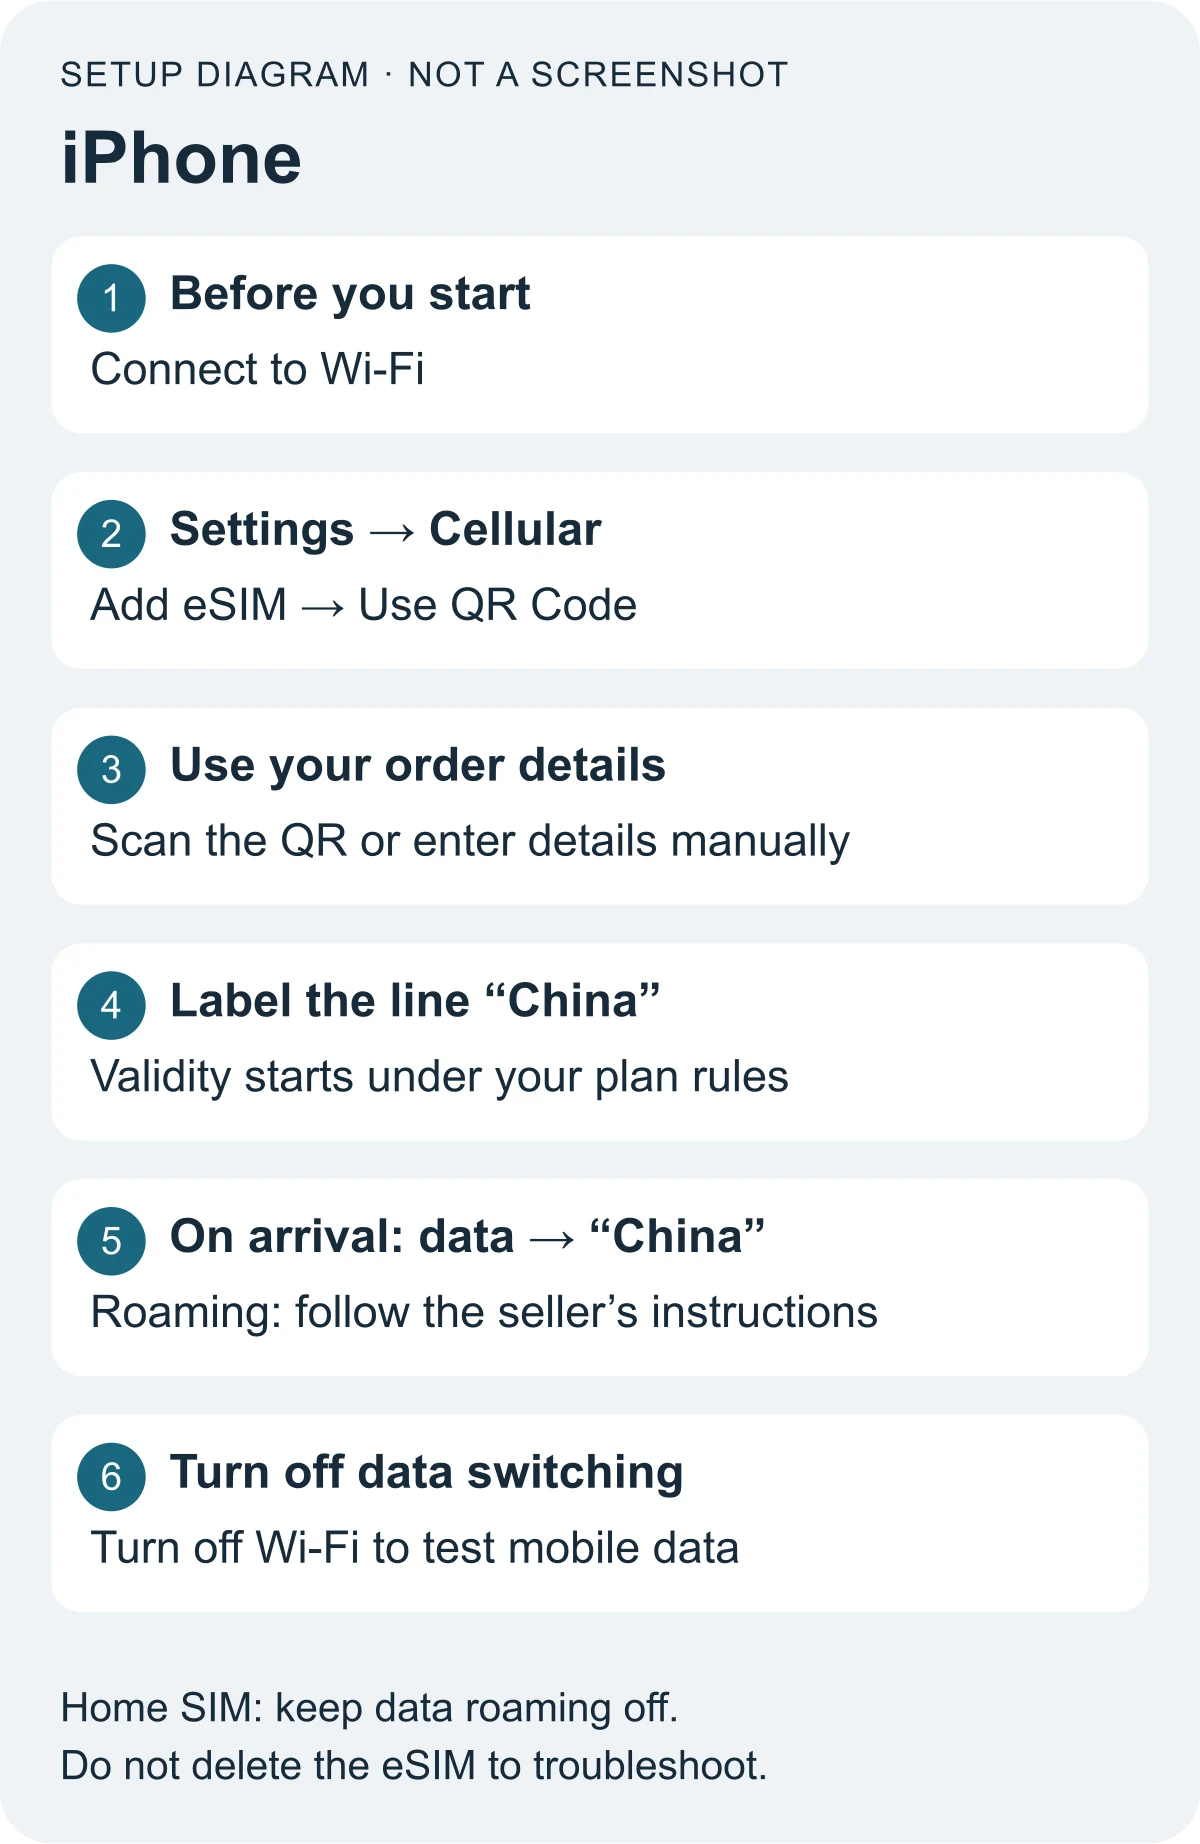
Teaching diagram based on Apple documentation, not an iPhone screenshot. The seller supplies your QR code and activation details after purchase.
- Connect to Wi-Fi.
- Open Settings → Cellular → Add eSIM → Use QR Code.
- Scan the code from your order and follow the prompts.
- Label the new line—for example, “China”—to distinguish it from your home line.
There is a simpler route: point the iPhone camera at the QR code from your order and tap the cellular-plan notification that appears. Menu labels depend on the iOS version—instead of “Add eSIM” you may see “Add Cellular Plan”.
If the QR code is on the same iPhone, iOS 17.4 or later lets you touch and hold it in your default browser or email app and choose Add eSIM. If that option is unavailable, show the code on another screen or use manual entry. Apple's installation instructions.
For manual setup, choose Enter Details Manually on the scanning screen. Copy the SM-DP+ address and activation code from your order. Enter an additional confirmation code only if the instructions supply one. These details are different from the APN used for data settings.
Samsung Galaxy
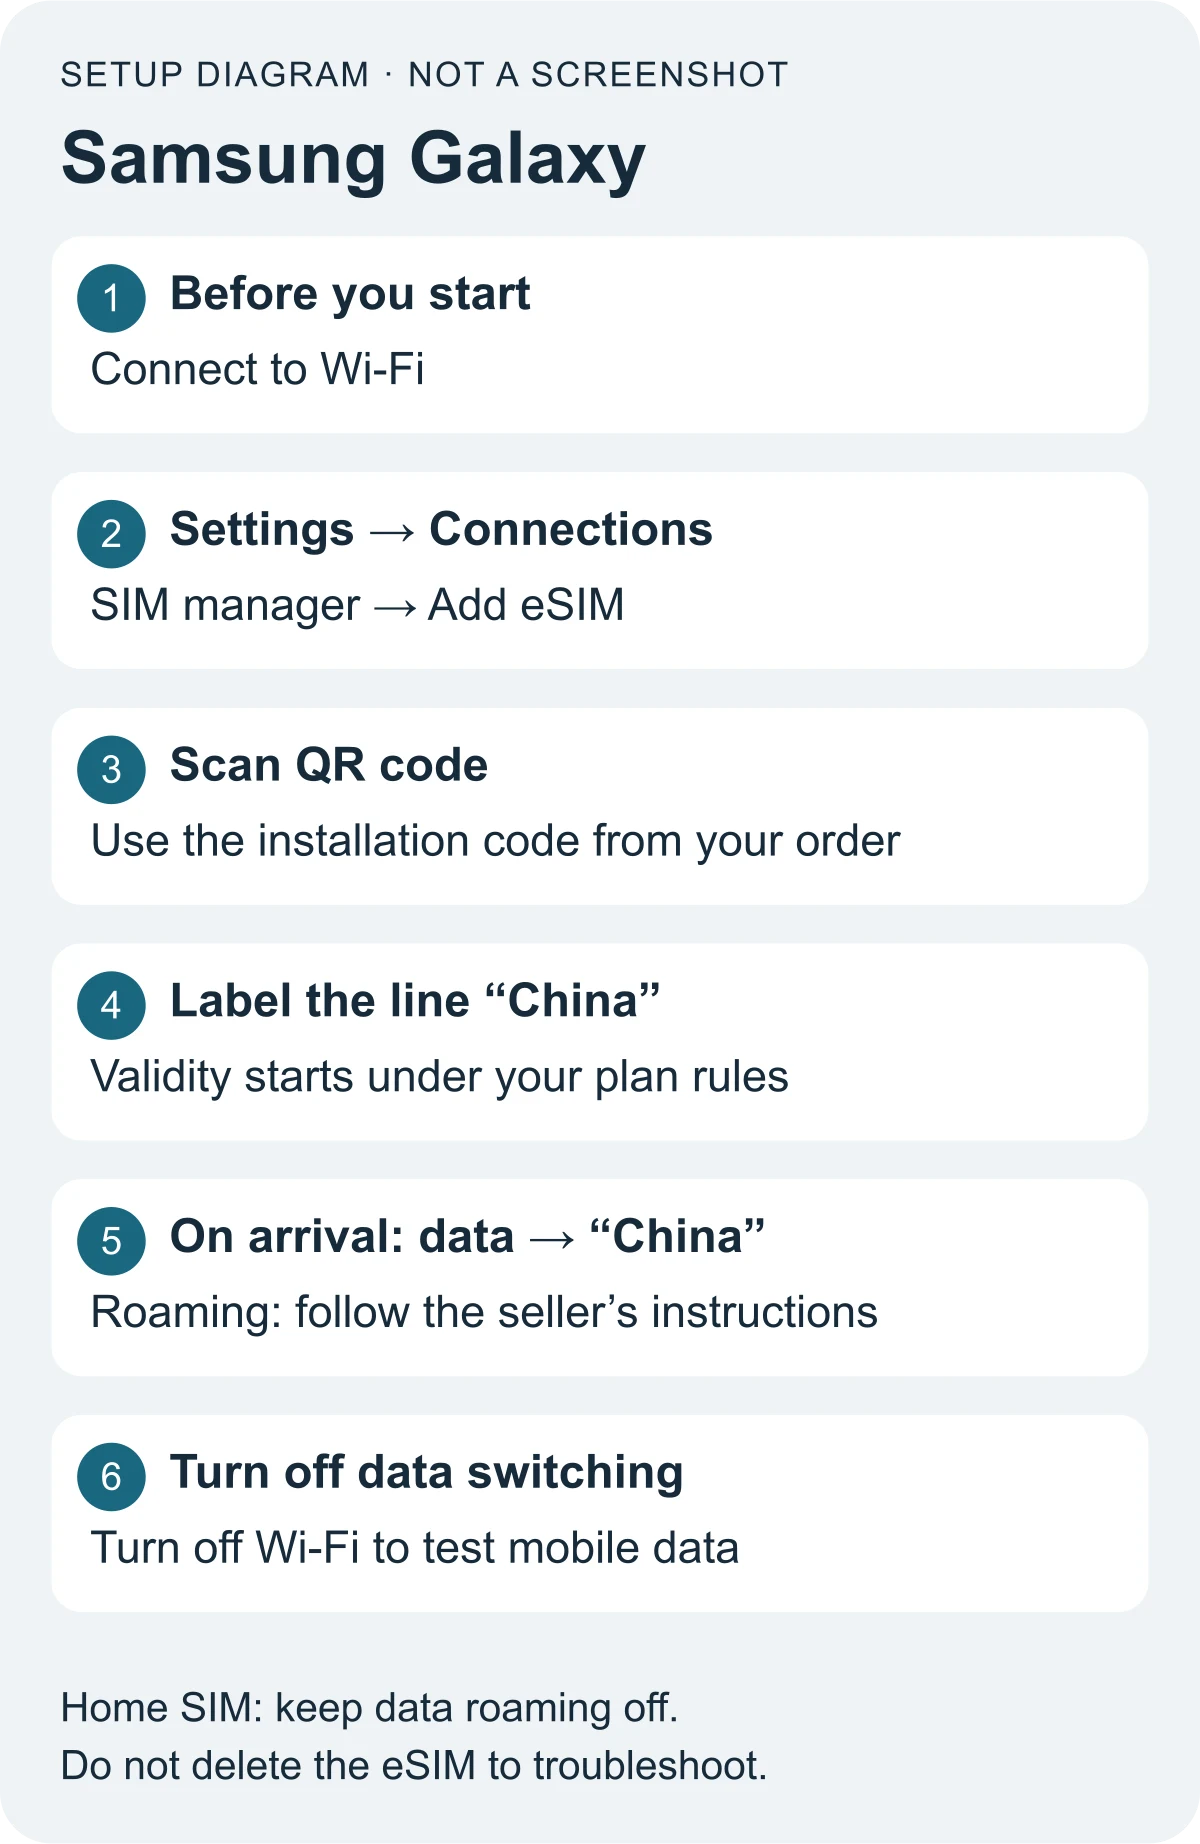
Teaching diagram. Menu names vary by model and One UI version.
The usual path is Settings → Connections → SIM manager → Add eSIM → Scan QR code. Follow the prompts; for manual setup, use the activation-code option provided in the menu. Labels may differ. Samsung's instructions.
Google Pixel and other Android phones
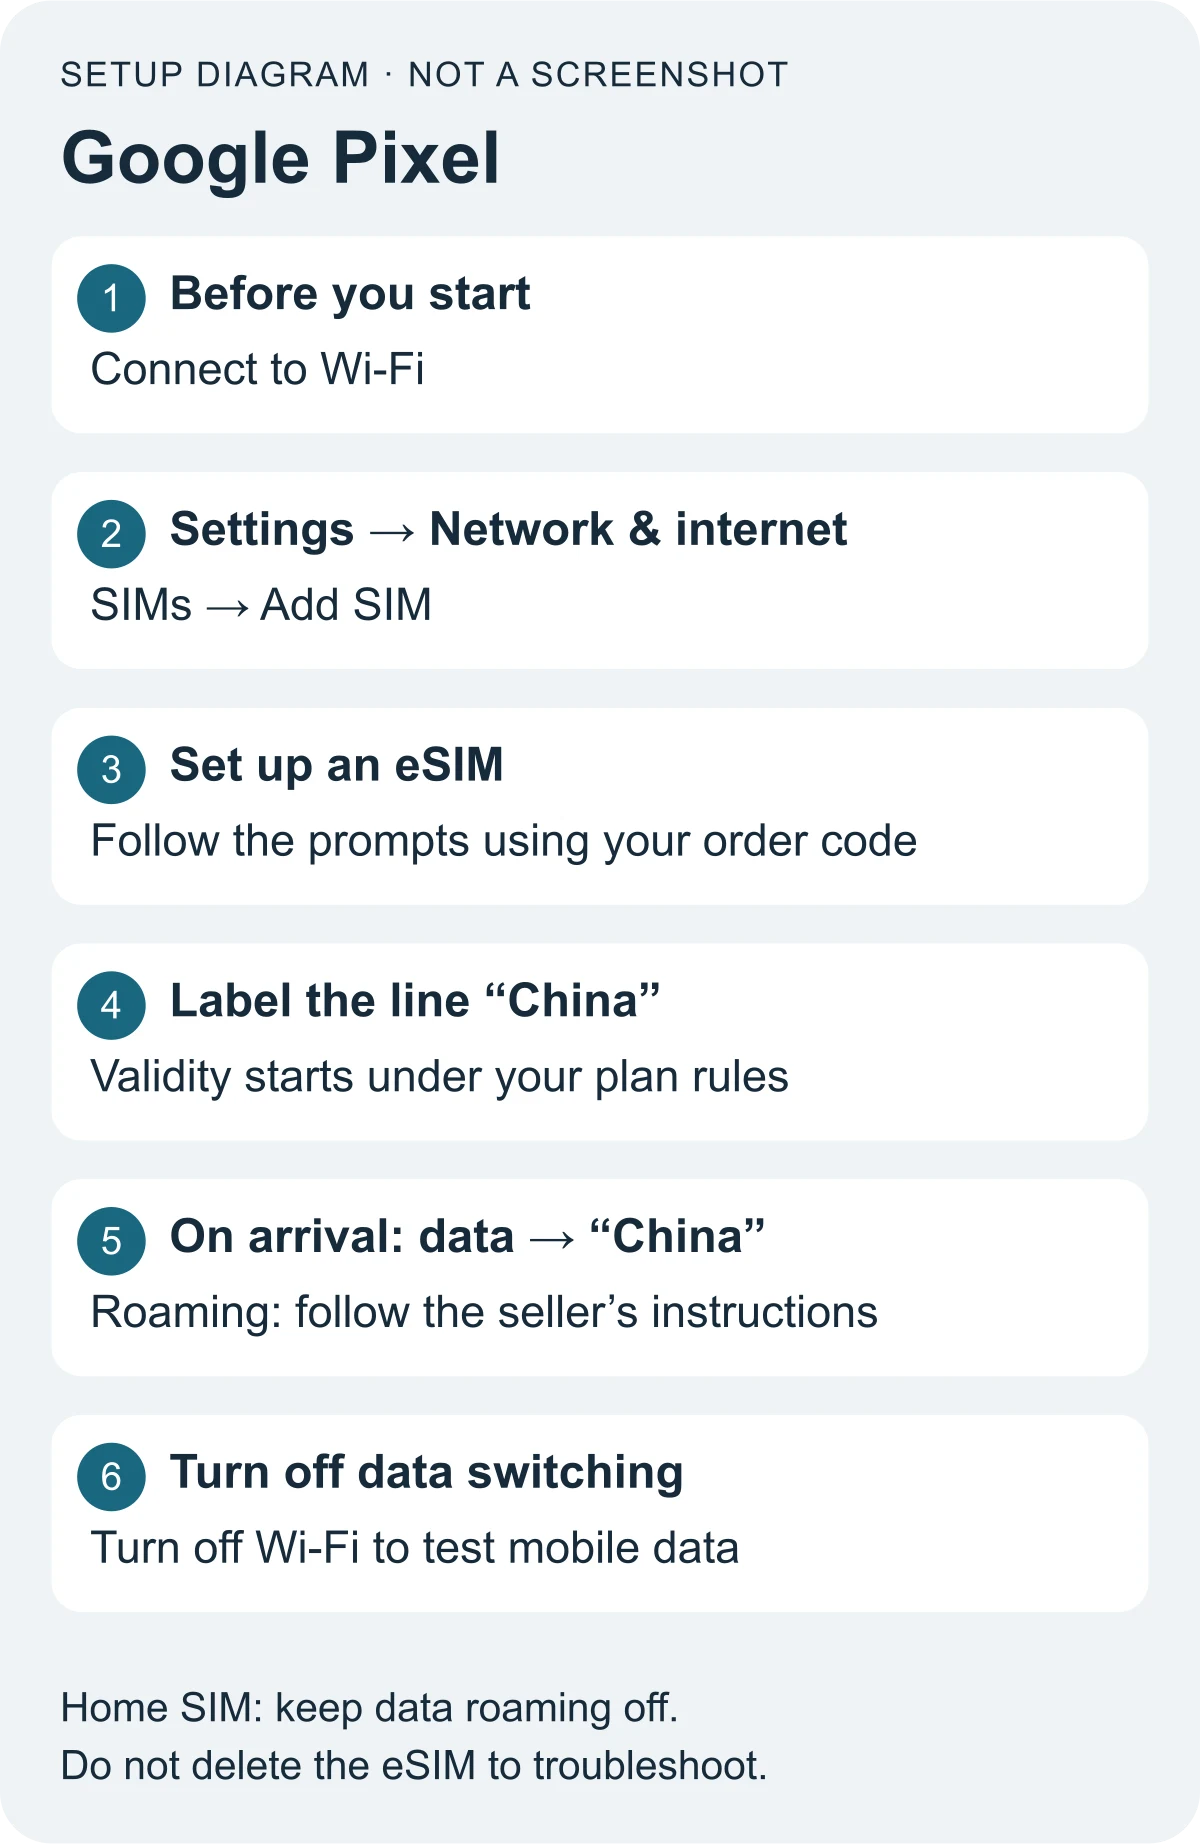
Teaching diagram based on Pixel documentation. Check the manufacturer's instructions for other Android phones.
On Pixel, look for Settings → Network & internet → SIMs → Add SIM → Set up an eSIM, then follow the scanning prompts. Other manufacturers use different paths. Searching Settings for “eSIM” can help; Samsung's instructions do not apply to every Android phone. Google Pixel instructions.
If the seller's app offers direct installation, you can use it instead of a QR code. A missing Install button does not itself mean the phone is incompatible; check the other methods in your order.
Step 6: turn on mobile data after arrival
Which SIM should you select?
| Setting | Selection |
|---|---|
| SIM for mobile data | Your travel eSIM, such as “China” |
| Roaming on the travel eSIM | On if the package instructions require it |
| Data roaming on the home SIM | Off |
| Automatic data switching | Off |
| Home line for SMS | Keep on if needed; check your carrier's terms separately |
| Wi-Fi during the connection test | Temporarily off, so you test mobile data |
Once you are within the plan's coverage:
- Turn on the travel eSIM line.
- Select it for mobile/cellular data.
- Enable data roaming on that travel line if the seller requires it. This is a common setting for roaming-based travel plans.
- Turn off automatic data switching between SIMs so the phone does not switch data to your home line automatically. With data roaming on, an iPhone does not switch lines automatically in any case.
- Temporarily turn off Wi-Fi and open a few pages.
On iPhone, choose the data line under Settings → Cellular → Cellular Data, and check Allow Cellular Data Switching there. Set roaming within the selected line. Samsung usually places data selection in SIM manager; Pixel uses the SIMs section. With switching off, mobile data may pause during a normal phone call on the other line. While data roaming is on for the travel line, iPhone turns off MMS and Visual Voicemail on the voice line; ordinary SMS still arrive. Apple on Dual SIM, Google on selecting a line.
What about your home SIM?
If you need your usual number for SMS, leave that line on, but turn off its data roaming and do not select it for internet access. This does not disable every chargeable service: calls and other activity remain subject to your home carrier's terms. Check those before travelling. If you do not need the number, you can switch the whole line off. Apple on using two lines abroad.
While the home line is off, it cannot receive SMS. On Android, check the selected data SIM and your model's instructions before changing roaming settings. Pixel mobile-network settings.
If your eSIM is not working
Work through the checks in order, changing one setting at a time. Do not start by deleting the profile or resetting the phone. Apple recommends simple line checks and restarting; delete an eSIM for troubleshooting only when your carrier tells you to. Setup troubleshooting, Apple's deletion warning.
| Problem | What to check next |
|---|---|
| QR code is rejected | Check installation internet access, compatibility, and whether the profile already appears in the SIM list. Ask the seller if it says the code was used |
| “No service” before departure | Check coverage. A China profile may not connect in your departure country |
| No service after arrival | Turn the line on; check coverage and validity, then try toggling airplane mode and restarting |
| Signal but no internet | Check the data SIM, required roaming, remaining allowance and APN |
| Internet works but one app does not | Try other sites. The service itself or regional restrictions may be responsible |
| Speed drops sharply | Check the daily limit and reduced-speed policy; contact support if the cause is unclear |
| Hotspot does not work | Confirm the plan allows it, then check the seller's instructions |
Which APN should you enter?
An APN is the access-point name your phone uses for mobile data. There is no universal APN for all China eSIMs. Use the value in your order or from official support. Do not guess with cmhk, 3gnet or a setting found elsewhere online.
For product 53873746, the listing we checked specified cmhk. This is an example for that product on the check date. Do not apply it to another product, or override different instructions supplied with your order. Seller's settings.
On iPhone, the field may appear under the line's Cellular Data Network settings; the carrier can hide it. On Android, look for Access Point Names or APN in mobile-network settings. If it is missing, do not install an unrelated configuration profile to make it appear. Apple on viewing and changing an APN.
If these checks do not help, use official support and provide your order number, exact phone model, system version, location and an error screenshot. Keep QR codes and activation details out of public reviews. Leave the profile installed while waiting for support.
Will Google and messaging apps work without a VPN in China?
Some travel eSIMs route traffic through infrastructure outside China, so access can differ from a local mobile connection. Airalo, for example, says its China-covering packages provide access without a VPN and attributes this to international routing. That is the provider's statement about its service, not a guarantee for every eSIM. Airalo's explanation.
Before buying, check what the specific package says about services you need. A data connection does not remove apps' own restrictions, account requirements or possible outages.
When you use Wi-Fi, traffic goes through that Wi-Fi network; the eSIM's routing does not carry over to it. If an app stops working after joining Wi-Fi, turn Wi-Fi off and try again through the eSIM.
Make your data allowance last
Before departure, download your documents and any useful offline resources. Disable app updates and large downloads over mobile data. Check whether your phone uploads photos and videos to the cloud through the eSIM.
On iPhone, Low Data Mode restricts some background activity and automatic downloads. On Android, look for your model's data-saving mode. Apple's explanation of Low Data Mode.
If tethering a laptop, check its background downloads too. Use the seller's order page or app for remaining data and validity; treat the phone's usage statistics as an additional guide.
Frequently asked questions
Can two people use one eSIM?
Do not expect to install one QR code on two phones. If hotspot use is permitted, the second person can connect to the first person's phone. For independent connections, choose a separate plan for each person.
Can I add more data?
Only if the selected eSIM supports top-ups. Check before buying; a new package may have its own validity period. A top-up option does not promise to extend unused data from the original plan. In our walkthrough, the general instructions and the order details disagreed about extensions: the instructions described them, while the order's details indicated the opposite. If you see conflicting terms, ask support before buying rather than assuming the more favourable interpretation applies.
Will I get a refund if my phone does not support eSIM?
Your order's terms determine that. Trip.com's general eSIM page advertises refunds before installation, but read the selected offer's rules before paying. Do not assume a refund is available after installation simply because you have not used data yet. Trip.com's general eSIM information.
Should I delete the eSIM after my trip?
First turn off the travel line and switch data back to your home SIM. You do not need to delete the profile immediately; check reuse and top-up options first. If automatic renewal is enabled, manage it through the seller's service. Deleting a profile from your phone should not be treated as cancelling future charges. Apple on deleting a profile and cancelling a plan.
What if my phone does not support eSIM?
Compare a physical SIM, your carrier's roaming options, or a hotspot from a companion's compatible phone. Check each option's coverage, allowance, cost and whether it provides any phone number you need.
Before you leave
- Your exact phone model is compatible and has no carrier restrictions.
- Coverage matches your route and stopovers.
- You know what starts validity and how days are counted.
- Your order and instructions are saved offline.
- The travel line is labelled and automatic data switching to your home SIM is off.
- You have saved the order's settings and know whether manual APN setup is needed, where to check remaining data and how to reach support.
- The clinic's and your coordinator's contacts, and the clinic address in Chinese, are saved offline.
Start with your phone and route. Then open Trip.com's eSIM offers and compare suitable packages using the checks above.
Trip.com and Airalo are named as the services we cite as examples; the clinic receives no commission and does not endorse a particular seller.